プログラミング言語のRustでOPC UAの環境構築してみました。
フリーのライブラリを使って、サーバーを作成しています。
実際に通信テストした手順を一から紹介します。誰でも同様に実施できます。
RustのOPC UAサーバーからクライアントと接続してみた
プログラミング言語のRustでOPC UAサーバーを作ってみました。
クライアントとの通信まで確認しています。
フリーのライブラリを使って、実際にテストするまでのポイントを紹介します。

ラズベリーパイで環境構築していますので誰でも実施可能です。
Rustのサーバ起動からクライアントの接続までを動画でも紹介しています。
是非一緒にご覧ください。
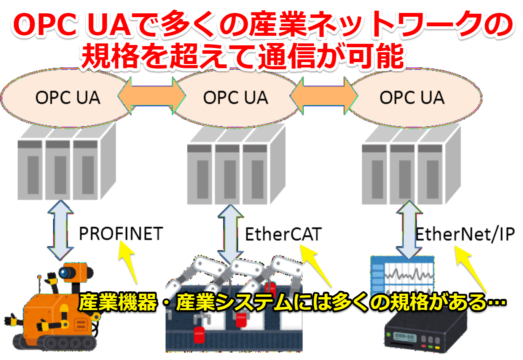
OPC UAとは
OPC UAとは産業用の通信規格の一つです。
産業機器・産業システムには数多くの規格が有ります。(PROFINET,EtherCATなど…)
OPC UAを使うことで、規格を超えて産業用のデータ交換することが可能です。
下記記事でOPC UAの使い方の記事をまとめています。(リンクはこちら)

RustのOPC UAのライブラリ
RustのOPC UAのライブラリは下記Githubに展開されています。
オープンソースで誰でも使用することが可能です。(ライセンスはMPL-2.0)

サーバー・クライアント両方対応しており、サンプルも多くあります。
今回は一番簡単な「simple-server」を使ってテストしていきます。

PythonのOPC UAライブラリ
PythonでもOPC UAの(フリーの)ライブラリがあります。
別記事になりますが、今回同様にサーバー環境構築のテストをしています。(リンク先はこちら)

セキュリティポリシーにも対応
今回のRustのライブラリはOPC UAのセキュリティにも対応しています。
OPC UAにはセキュリティポリシーが複数ありますが、各ポリシーを選択可能です。
(今回はテスト的な通信のため、セキュリティ無し(none)を選んでいます。)

PLCでもセキュリティポリシー
PLCのオプションでOPC UAに対応する場合でも、セキュリティポリシーは使えます。
別記事になりますが、PLCからセキュリティ証明書の発行テストもしています。
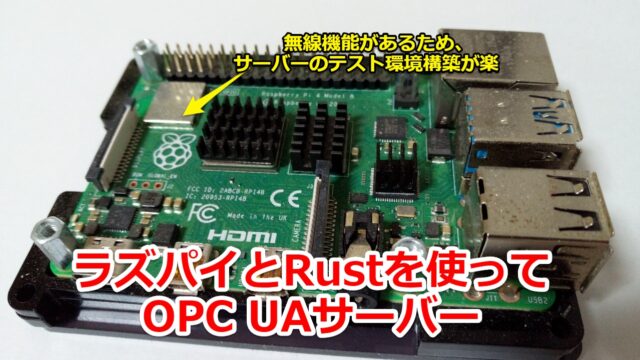
ラズパイとRustでOPC UAサーバー
今回はラズベリーパイとRustを使ってOPC UAサーバーにします。
最近のラズパイは無線機能を持っていますので、サーバーのテスト環境環境が楽です。
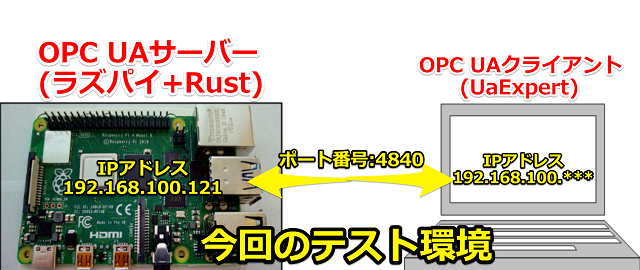
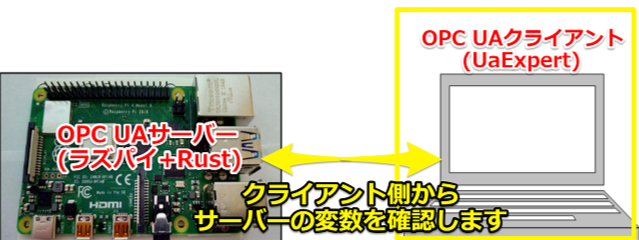
テスト環境のイメージとしては下記形です。
ラズパイをサーバーにして、PCのクライアントソフトと通信させます。
Rustのインストール
Rustのインストール方法からプログラム実行方法を別記事で紹介しています。
初心者・未経験の方でもラズパイで簡単に始めることが可能です。(リンクはこちら)

Lチカから始めてみたいという方は下記記事も参考ください。(リンク先はこちら)

OPC UAのライブラリのダウンロード
ライブラリに関しては各個人の方法でダウンロードお願いします。
Githubから手動でダウンロードしても良いですし、コマンドを入力しても構いません。
https://github.com/locka99/opcua
サーバーの設定
あくまで今回紹介する設定の手順は、(適当な)筆者のテストの一例です。
ライブラリのReadmeは必ず見るようにお願いします。
また「docs」フォルダにも多くのドキュメントがあります。そちらも参考になります。
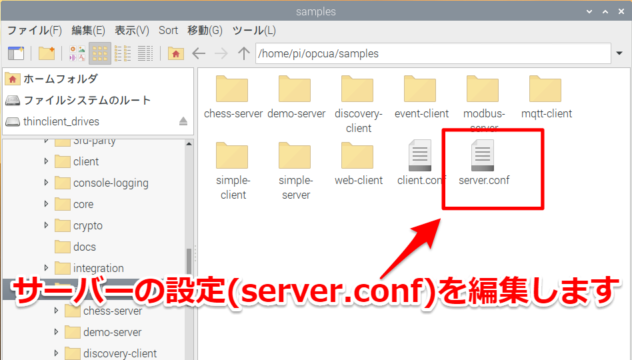
OPC UAのライブラリの中に「samples」があり、その中にサンプルプログラムがあります。
「server.conf」がサーバーの設定となりますので編集します。
筆者はVimで編集していますが、各自自由に対応してもらればOKです。
最初の設定はローカルホスト(127.0.0.1)接続となっています。
また一部ポートがOPC UAの4840でなく、4855に設定されています。
今回テスト環境のIPアドレス(192.168.100.121)とポート番号4840に統一しました。
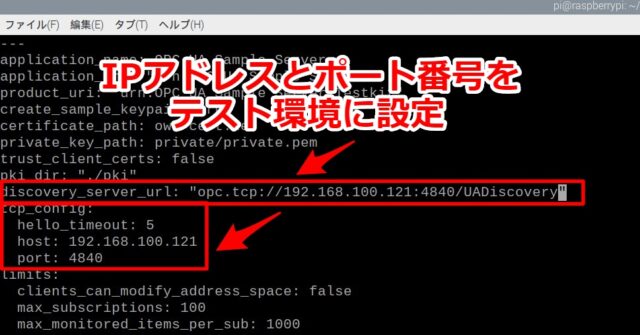
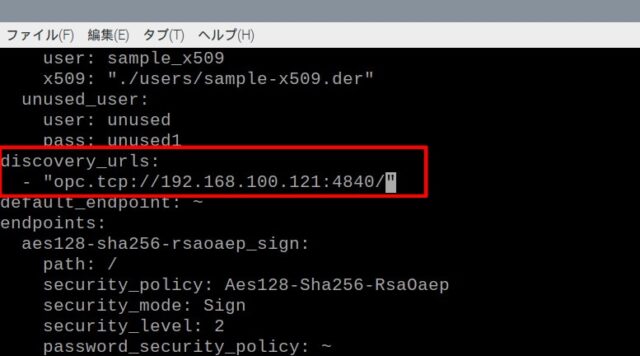
筆者が変更した場所は下記のサーバーURL・ポート番号関連の3か所です。
(本当に3か所とも同じ設定にすべきなのかは、確認・検証できていません)
テスト環境に合わせて、変更する必要があります。
hello_timeout: 5
host: 127.0.0.1
port: 4855
- "opc.tcp://127.0.0.1:4855/"
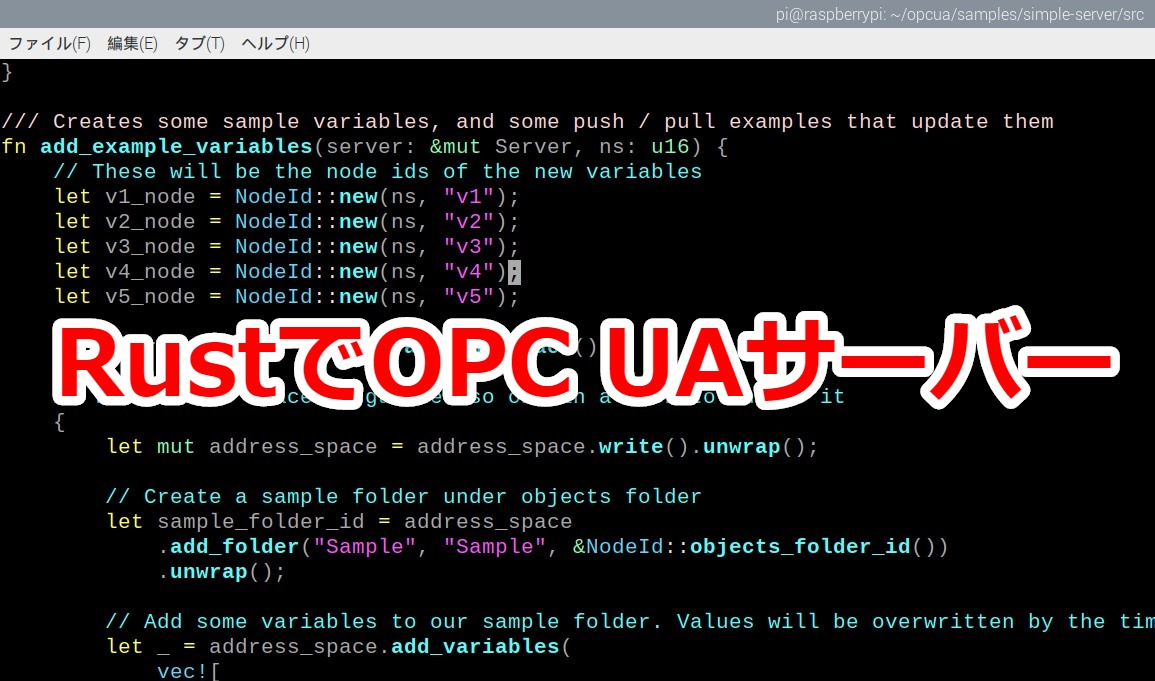
サーバーのプログラム
今回使うサーバーのプログラムは「simple-server」→「src」フォルダ内にあります。
github上だと下記サンプルプログラムです。
https://github.com/locka99/opcua/blob/master/samples/simple-server/src/main.rs
実際にテストしたプログラムはサンプルからほんの少しだけ修正しています。
OPC UAで通信する変数を4個→ 5個に増やしてテストしています。
|
1 2 3 4 5 6 7 8 9 10 11 12 13 14 15 16 17 18 19 20 21 22 23 24 25 26 27 28 29 30 31 32 33 34 35 36 37 38 39 40 41 42 43 44 45 46 47 48 49 50 51 52 53 54 55 56 57 58 59 60 61 62 63 64 65 66 67 68 69 70 71 72 73 74 75 76 77 78 79 80 81 82 83 84 85 86 87 88 89 90 91 92 93 94 95 96 97 98 99 100 101 102 103 104 105 106 107 108 109 110 111 112 113 114 115 116 117 118 119 120 121 122 123 124 |
//! This is a simple server for OPC UA. Our sample creates a server with the default settings //! adds some variables to the address space and the listeners for connections. It also has //! a timer that updates those variables so anything monitoring variables sees the values changing. use std::path::PathBuf; use std::sync::{Arc, Mutex}; use opcua_server::prelude::*; fn main() { // This enables logging via env_logger & log crate macros. If you don't need logging or want // to implement your own, omit this line. opcua_console_logging::init(); // Create an OPC UA server with sample configuration and default node set let mut server = Server::new(ServerConfig::load(&PathBuf::from("../server.conf")).unwrap()); let ns = { let address_space = server.address_space(); let mut address_space = address_space.write().unwrap(); address_space .register_namespace("urn:simple-server") .unwrap() }; // Add some variables of our own add_example_variables(&mut server, ns); // Run the server. This does not ordinarily exit so you must Ctrl+C to terminate server.run(); } /// Creates some sample variables, and some push / pull examples that update them fn add_example_variables(server: &mut Server, ns: u16) { // These will be the node ids of the new variables let v1_node = NodeId::new(ns, "v1"); let v2_node = NodeId::new(ns, "v2"); let v3_node = NodeId::new(ns, "v3"); let v4_node = NodeId::new(ns, "v4"); let v5_node = NodeId::new(ns, "v5"); let address_space = server.address_space(); // The address space is guarded so obtain a lock to change it { let mut address_space = address_space.write().unwrap(); // Create a sample folder under objects folder let sample_folder_id = address_space .add_folder("Sample", "Sample", &NodeId::objects_folder_id()) .unwrap(); // Add some variables to our sample folder. Values will be overwritten by the timer let _ = address_space.add_variables( vec![ Variable::new(&v1_node, "v1", "v1", 0 as i32), Variable::new(&v2_node, "v2", "v2", false), Variable::new(&v3_node, "v3", "v3", UAString::from("")), Variable::new(&v4_node, "v4", "v4", 0f64), Variable::new(&v5_node, "v5", "v5", false), ], &sample_folder_id, ); } // OPC UA for Rust allows you to push or pull values from a variable so here are examples // of each method. // 1) Pull. This code will add getters to v3 & v4 that returns their values by calling // function. { let address_space = server.address_space(); let mut address_space = address_space.write().unwrap(); if let Some(ref mut v) = address_space.find_variable_mut(v3_node.clone()) { // Hello world's counter will increment with each get - slower interval == slower increment let mut counter = 0; let getter = AttrFnGetter::new( move |_, _, _, _, _, _| -> Result<Option<DataValue>, StatusCode> { counter += 1; Ok(Some(DataValue::new_now(UAString::from(format!( "Hello World times {}", counter ))))) }, ); v.set_value_getter(Arc::new(Mutex::new(getter))); } if let Some(ref mut v) = address_space.find_variable_mut(v4_node.clone()) { // Sine wave draws 2*PI over course of 10 seconds use chrono::Utc; use std::f64::consts; let start_time = Utc::now(); let getter = AttrFnGetter::new( move |_, _, _, _, _, _| -> Result<Option<DataValue>, StatusCode> { let elapsed = Utc::now() .signed_duration_since(start_time) .num_milliseconds(); let moment = (elapsed % 10000) as f64 / 10000.0; Ok(Some(DataValue::new_now((2.0 * consts::PI * moment).sin()))) }, ); v.set_value_getter(Arc::new(Mutex::new(getter))); } } // 2) Push. This code will use a timer to set the values on variable v1 & v2 on an interval. // Note you can use any kind of timer callback that you like for this. The library // contains a simple add_polling_action for your convenience. { // Store a counter and a flag in a tuple let data = Arc::new(Mutex::new((0, true))); server.add_polling_action(300, move || { let mut data = data.lock().unwrap(); data.0 += 1; data.1 = !data.1; let mut address_space = address_space.write().unwrap(); let now = DateTime::now(); let _ = address_space.set_variable_value(v1_node.clone(), data.0 as i32, &now, &now); let _ = address_space.set_variable_value(v2_node.clone(), data.1, &now, &now); let _ = address_space.set_variable_value(v5_node.clone(), !data.1, &now, &now); }); } } |
クライアントソフト(UaExpert)
OPC UAクライアントソフトはUaExpertを使用しています。
クライアント側からRustで作ったOPC UAサーバーの変数を確認します。
UaExpertのダウンロード・使い方を下記記事で紹介しています。(リンクはこちら)
OPC UAクライアントのフリーソフトUaExpertを使ってみた

RustのOPC UAサーバーのテスト
サーバー・クライアントの環境構築が完了しましたので、テストを行います。
冒頭でも紹介しましたが、テストの一連の流れを動画にしています。
是非一緒にご覧ください。
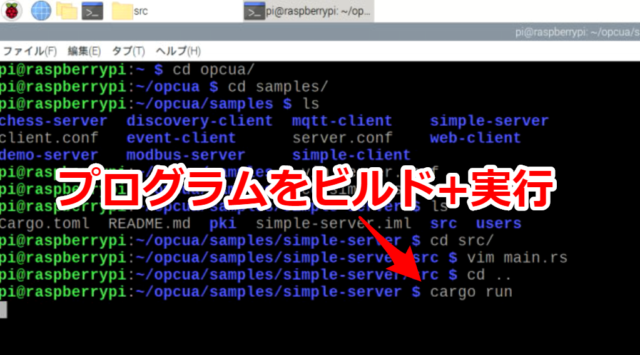
サーバーをビルト+実行
今回テストする「simple-server」のフォルダで、ビルト+実行を行います。
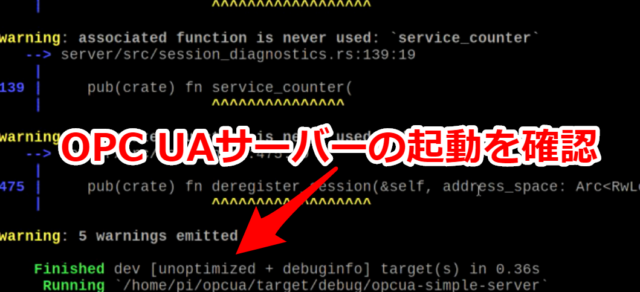
正常にOPC UAサーバーが起動できれば、Running…と出てきます。
クライアントからサーバーに接続
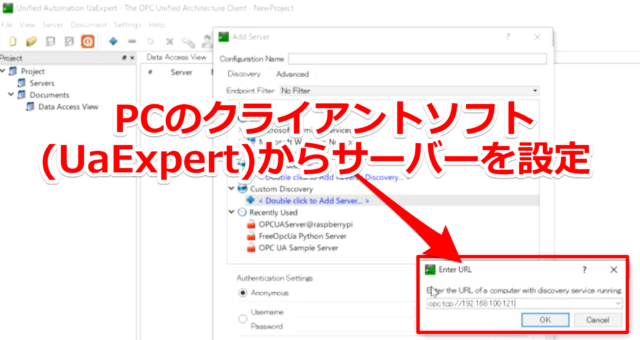
PC側のクライアントソフト(UaExpert)からサーバーに接続します。
OPC UAサーバーのIPアドレスを入力して設定を行います。
今回はテスト通信のため、セキュリティポリシーは使用していません。
セキュリティ無し(none)で接続しています。
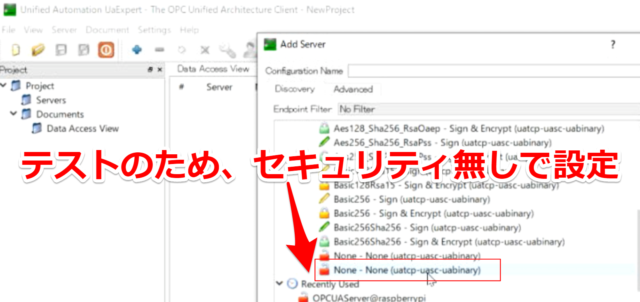
サーバーとの通信設定しましたら、connectで接続します。
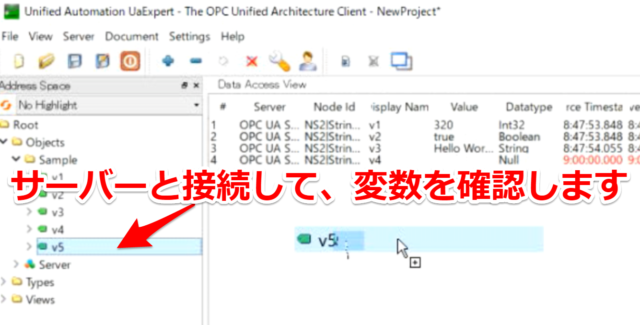
接続完了したらアドレススペース(Address Space)から変数を確認します。
OPC UA通信を確認
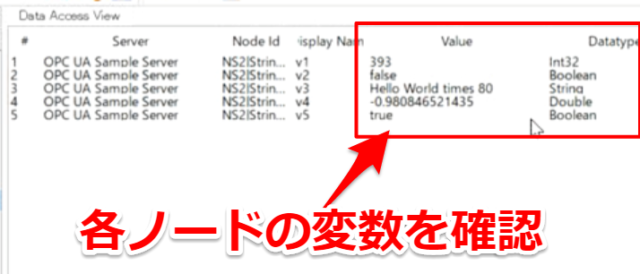
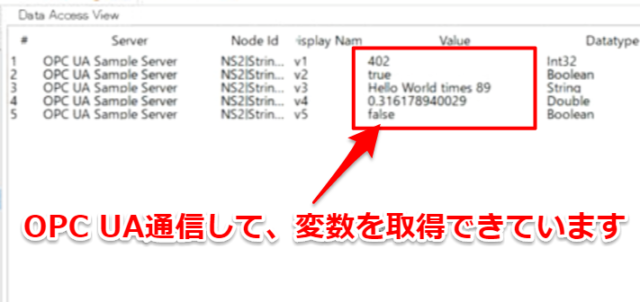
OPC UA通信で各ノードの変数を確認できました。
一定周期で変数を取得しているので、画面の値も変わっていきます。
まとめ
今回はRustでOPC UAサーバーの使い方に関して紹介させていただきました。
記事をまとめますと下記になります。
ラズベリーパイ(raspberry pi)で簡単にRustとOPC UAを使うことができます。
皆様もぜひ試してみてください。


コメント